Showing posts with label decoupage. Show all posts

Thursday, April 14, 2011

Decoupaged Glass Plates tutorial

Hello all,
Well, today I am going to jump in and try my hand at showing a tutorial. The project is super simple with the right tools and product.
Don't even talk to me about doing a video!


Decoupaged Glass Plate Tutorial:
you will need:
   clear glass plate clean, oil free (fingerprints, etc.)
   ModPodge matte, gloss or glitter!
   sponge brush
   glass of water for glue brushes
   plastic lid or plate to pour glue into
   damp rag/paper towel for finger clean up during project
   newspapers to cover your craft surface
   craft mat or placemat size rectangle of waxed paper
   pretty napkins
   sharp scissors

Step 1
  Spread newspapers, wax paper etc. to cover work surface
  Get damp rag and place in a bowl or on plastic plate/lid
  Prepare napkins:
      remove extra plies so you have only one ply of decorated napkin. You can use the leftover white napkin plies in later steps and also use them as napkins!
Step 2
   Cut motifs from napkins. Cut many more than you think you will need!
Very Important: lay out your napkin cuttings frequently so you have an idea for placement. Continue to do this as you cut.

Do your final placement layout.

Now is the time to trace and cut out a background sheet of tissue paper or napkin. This is when the other napkin plain plies will work well.

Set aside.

Step 3
   Pour a glob of ModPodge onto plastic lid.
   Place clear glass plate FACE DOWN.
   Spread a little glue to cover where you want to put your first napkin cutting.
   Place napkin cutting FACE DOWN, and dab more glue on with brush.

tip: remember that you will be placing your motifs down from the front to the back.
Example - if you are gluing down a watering can full of flowers, you will first place the watering can down. Then you will place flowers on top of that, so when finished the flowesr will be inside (or behind) the can. Then you will place any clouds/sky on top of the flowers, so the finished scene will look like clouds in the back, flowers in vase.

   Continue spreading a little glue, placing napkin motifs and dabbing with more glue until all your first pieces are in place.


Problem?  It is very easy to tear the thin napkin pieces. You can smoosh some of them together with the wet glue. Hate it? Remove it quickly and do another piece instead. Or, make the tears part of your overall look, and be sure to do more of them. Think crackled Venetian vases or old paintings.

tip: make sure all the napkin pieces are covered with glue.

Step 4
Set aside on wax paper. Let dry.
Now is the perfect time to start on another glass plate or bowl, while your first is drying a bit.
Here, my lovely assistant Pam is starting on a small bowl. She has cut out a few pansy motifs from one napkin, then has taken another blue striped napkin and torn it into small strips.
Remember! You are gluing napkin pieces face down onto the bottom outside of the bowl.
Pam has glued a few pansy motifs first, and is then applying blue strips on top of them.

Step 5
Pick up your dry/wet glass plate carefully.
Get the set aside one large piece of tissue paper/napkin that you have cut out.
You can now apply the covering "back" layer. This usually goes on top of all your glued pieces, but doesn't have to. Play around with looks, but do this BEFORE you start gluing things down! It is very difficult if not impossible to remove motifs once the glue has started to set (which is within seconds sometimes!)
Remember your steps: Put down a layer of ModPodge first, being careful not to tear or smoosh the already glued down motifs. Then place tissue paper/napkin on top and dab glue to cover it all. If you don't get glue everywhere on this step, it will leave a dry spot that is okay but doesn't look great!

This plate is drying. After first layer of napkins, I am now adding a layer of yellow behind the lion, and torn strips of light blue and white napkins around the edge.

Step 6
Set aside to dry thoroughly.
Go back to your second bowl, plate or whatever, and apply finishing touches.
Here is a Happy Birthday bowl that I made.
Here it is done, but drying:

Here it is dry, and shows you the unfinished edges where the tissue paper is sticking up. I actually did this on purpose, to give a finished edge when I am done .
 
Here I am holding the bowl up to the light so you can see it at a different angle.
I used a mixture of matte ModPodge, and glitter ModPodge.

Step 7
Finish up any decoupaged pieces you have more steps to do.
If you want to do a small piece now you can decoupage small candle cups, or in this case, we used mini clay pots:

Here are the finished products:

In the above 2 photos you can see the mini bowl and the bunny plate still need their edges finished.

Step 8 Final
Take an old emery board or file. File off the tissue edges that are sticking up away from the rims. Smooth the edges with the file, as needed.
Well, just hmmmm. I have no idea why this particular picture is tipped wrong. It isn't in my saved files that way! Sorry, guess you will just have to turn your head or hold your monitor up sideways!

Here are our finished samples:


 Oh just ick. Guess that is what learning new things is all about! I will have to play with this photo issue, but I do want to get this wonderful and easy craft to you, so please just bear with me, and do that crooky neck thing!

This is the plate I did years ago:
front:
back:

 laid down on  white napkings to show detail:
Yes! Those pansies and leaves are from a napkin!!

Here are some last minute finishing tips:

These are decorative plates and not meant to be washed. If needed, you can wipe the glass surface with a damp cloth, and dry immediately.
They are NOT food safe unless you spray with food safe finish.

The back side can often feel 'sticky', even after it is dry. Use a clear acrylic spray to eliminate this. I like Kryon.

Check and see, I believe there are food-safe sprays that you can use! After spraying with this kind of spray, you can put food on the plate, but still only hand wash with very mild soap and rinse with a damp rag.

If you can't find the food safe spray, or just want to use the clear acrylic spray, that's fine. You can put wrapped candy on you plate if you wish. You could use it as a serving plate for pre-wrapped tea bags, or 3 little tea cups. How about a creamer/sugar set?

I think the birthday bowl would be a great place to anchor some birthday balloons!

I hope you have enjoyed my first tutorial.
Print these out on sticker paper, and have fun decorating cards, lunch boxes or Easter eggs!

inkspired


Thursday, April 7, 2011

A Vintage Easter

Good day!
 a stamped card colored with glaze pens

Today I am in an Easter mood. Not the chicks and eggs and candy sort of Easter, but an Easter with the belief that Jesus Christ died for our sins on the cross, and was buried in a borrowed tomb, and that 3 days later he rose from that grave in a new body - resurrected. With His resurrection we are assured that He had conquered death, and could offer us eternal life with Him in heaven.

There is solemnity.
There is deep grief.
There is sorrow.
BUT there is also joy,
there is hope,
there is confidence.
c.1905

'Restored'

"Whenever I lose my sight of the Cross,
Black clouds surround me and I feel almost lost,
Although on Calvary my soul was set free,
I forget that Jesus really did that for me.

Sometimes I wrap myself up in myself,
And try to live my life without my Lord's help,
And again those clouds appear and nothing goes right.
Life stops when I let Jesus out of my sight.

Don't you know what Jesus wants of you
Is everything you've got my friend,
For you to give it all to Him,
And that is where your true life begins.

And when I resolve to live day by day,
I communicate with God and He leads the way.
The skies are blue and Jeus smiles down on me,
As I walk reminded of the price He paid for me."

c.1903
  

"For God so loved the world that He didn't send a committee."
- church bulletin humor

c.1905

"Peace on the outside comes from
Knowing God within."

I know these say Christmas Bells, but I like Easter Bells!!


c.1896

c.1897

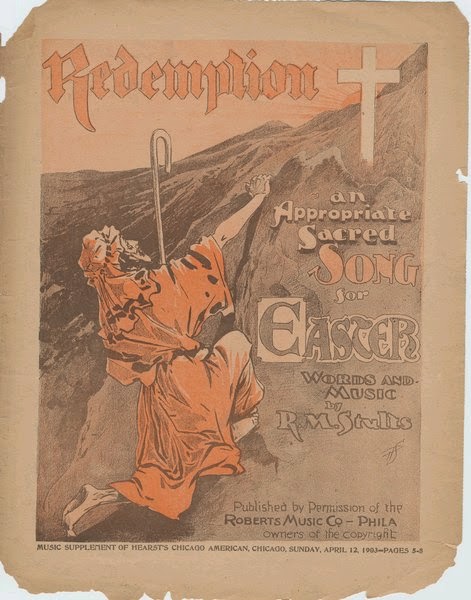
Don't forget, you can print these wonderful antique song sheet covers, and cut out.
Take your Mod Podge glue and a wood plaque (available at all craft/hobby stores)
and decoupage the cover onto it.
What a beautiful and unique wall hanging!
After decoupaging, you can add some silk flowers to a corner or two for added beauty.

These vintage prints also lend themselves very naturally to collage/altered art.
Take a coffee table, or end table. A chest, or?
Decoupage on a group, overlapping the edges. Add some vintage lace in while you are decoupaging. This produces a stunning, gorgeous piece of art furniture that is functional.
Be sure to use the clear acrylic spray to finish it, after all is very dry.
This will prevent the tackiness from the Mod Podge.
I like to use Krylon products, they always produce good results.

 c.1890

"For God so loved the world that He gave His only Son
so that anyone who believes in Him will not die, but receive eternal life."

from the Gospel of John, chapter 3 verse 16


c.1917

"We may give without loving,
but we cannot love without giving."
- Bernard Meltzer

This is a lovely photo from Ireland:
Glansevern Hall Gardens circa 1840

"There is no death, only a change of worlds."

- Chief Seattle, North American Native

"Our Lord has written the promise of resurrection,
not in books alone, but in every leaf of springtime."

- Martin Luther, theologian and reformist

I do hope you enjoyed this little stroll through
my vintage Easter, my present Easter, and my future Easter.
sincerely,
inkspired

Tuesday, March 15, 2011

Day 3 Irish countdown, Barbies, Decoupage and Vintage song sheet graphics

Welcome!

Today I would like to share with you one of my passions -

Barbie, Barbie, Barbie!
Yes, it's true. I am an adult (so my age says) and I collect Barbies! I love the fancy dresses and costumes. The outrageous hair.  All the glitter and glam.
The fantasy of it all.
Here are a few examples of Irish Barbies that Mattel has produced:
"It's just a Barbie kind of world...."

Here are some great vintage song sheets, from Indiana's Music Libraries. See side bar for the link.


So, what can you do with these great images except just admire them?
DECOUPAGE!!
Decoupage is such an easy project to do, and the results can look so professional.
My favorite decoupage medium? The standard Mod Podge is still one of the best. I have tried several others, which all seem to work fine. I do really like Aleene's products. She has a reverse decoupage glue and a napkin decoupage glue among many others.

Simple decoupage project:
Pick out an item. Some ideas:
   a frame with glass (use Aleene's reverse decoupage glue)
   a side table
   a frame with a large border
   a mirror with a large border
   a trinket box
   a wood stool
   a plaque
really, just about anything you want.

Now, just follow the directions on the bottle! I'm not going to repeat them here, they are so simple.

Hint: before you start, remove all surface dirt with a good scrubbing if needed, or remove wood dust with a tack sheet.

To use the Irish song sheets, click on the image. Copy and manipulate to the size desired. Watch for the pixels. That means if you blow it up too much it will be very grainy, or 'pixeled'.  Print. Wrinkling the printed paper can help some to disguise the larger 'pixels'. Lightly swipe a dark brown ink pad over the wrinkles to age it even further.
For a very distressed aged look, tear the edges. Practice! Then sponge on some of that great dark brown ink you have.

Apply decoupage glue as directed on the jar/bottle.

Fun hint: At this "wet" stage you can sprinkle on glitter! Try a little green sparkle, or some irridescent glitter!

While these examples are not done using song sheets, it will give you some ideas on how a copied picture can look:
Garden Shrine by inkspired

Here is an example of how decoupage glue can be used to glue
recycled paper scrap - in this case catalog pictures of book covers and then heavily sprinkled with glitter:
Fairy Book Box with closeup of inside by inkspired
Share your completed projects!
Found any tips that will help the rest of us?
Write and let me know!

"May the good Lord take a liking to you...
but not too soon!"
- Irish proverb

inkspired